Michael Hooker Microscopy Facility (MHMF.ORG)
|
|
Michael Hooker Microscopy Facility (MHMF.ORG) |
Using LAS AF Lite 2.6 - Viewing Leica SP2/SP5 Confocal Images
Notes:
Avoid version 3.0 and later since they doe not load SP2 .LEI image databases
Introduction:
On the Leica SP2 LCS confocal software scanned images are initially stored in RAM and are listed in the "Experiments" box. When the "Save" button is pressed for the first time in a new experiment a Save As dialogue box opens requesting for a database name at the box labeled "File name". The image data will be saved to the hard drive once the "save" button on the dialogue is pressed.
The above procedure is the standard method of saving scanned images and derived images (such as projections and overlays) on the Leica SP2 confocal microscope. Hitting the "save" button will save subsequently scanned data to the hard disk drive, where it is protected from loss from events such as power failures and operating system crashes. The saved data becomes part of an organized experimental image database. The images in the database can viewed in the same chronological order in which it was scanned, and multiple images of channels, z-series and time-lapse viewed in proper association, rather than having to deal with a large number of individual tiff files. The database consists of the named directory, which contains .tif image files, one corresponding to each scan, fluorescence/transmitted channel and z position, an .lei file (a visual basic database file containing scanning parameters) and a .txt file (a text readable version of the .lei database information).
Although it is possible to view the scanned tiff files directly in most imaging programs, it is more efficient to view the scans using the free Leica LAS AF lite v2.6.3 viewer, or the full LCS software on the MHMF workstations called Nomarski or Snell. Also, the image database stores and can display scanning parameters, such as objective magnification, zoom factor, laser powers, PMT gains, filter settings are stored into the database for each scan. The database information allows tasks such as adding scale calibrations to be done later, and the scanned images to be viewed in chronological order with multiple channels overlaid or z-series or time lapse scans to be viewed using the free LAS AF lite v2.6.3 viewer which can be installed on WindowsXP/7/8 PCs. Also several 3rd party programs (e.g. Volocity, Image Surfer, ImageJ) can be used to view images and read the image database parameters.
Image files are stored as .TIF one for each channels, z-position. The .lei is a database file which contains most of the parameters used to acquire each scan. A human readable copy is stored as a .TXT file. The sample data is available in 70723-buccal.zip
Cautions:
Read/Write permission may be required required to open a Leica Image Database: Image data base files must be in a location with read & write permissions. Since CD/DVDs are read only, copy the whole database to the hard drive, and open it from the hard drive if necessary. Depending on the operating system permissions may need resetting on the hard drive.
Renaming: The files of the image database should not be renamed or modified outside of the Leica LAS-AF or LCS software, unless working on a copy. The .tif and .lei files should be kept in the same directory. However the directory name may be changed with no consequence.
Operating System: Leica LCS Lite software only runs on WindowsXP/Vista/7/8 or Windows2003/2008 server operating systems.
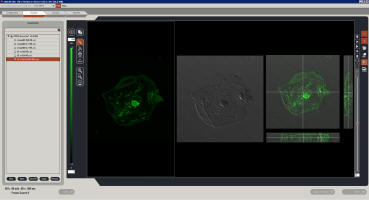
The Leica LAS-AF Lite image browser version 2.6
The sample Leica image database used on this page can be downloaded in compressed form from here 70723-buccal.zip. Winzip can be used to uncompress the downloaded file.
In the "Experiment" region hit the "Open" button or do File --> Experiment ---> Open
In the pull down near the "File name" box select "LCS file (*.lei)
Browse to the .lei file and double left click
Palette intensity can be altered by clicking on the Lut color bar on the right of the image and dragging the up and lower - for each image independently
Palette color can be changed by clicking on Lut bar and choose a new palette scheme.


And pressing the "Save All" button to write the database to the hard drive
Click and drag on the cross hairs in order to change the viewed planes in any of the three panels
- Alternatively scale bars can be created in Photoshop, after the image pixel size is determined
- Right click on image name
- Choose Properties
- Scroll down to find um per pixel (Voxel-Width or Voxel-Height entry) or save image information as xml file by hitting Save as...
- (Alternatively the voxel dimension can be found in the .txt file, which can be opened with any text editor, e.g. Word - look for the section with the Series Name: with the same name is the image name and find the Voxel-Width value)
- In Photoshop: e.g. for a 10 um scale bar with an image with 0.232 um/pixel draw a line with
- = 10 um / 0.232 um/pixel = (Scale bar size [um]) / (pixel size [um/pixel])
- = 43 pixels
- Hold down the shift key while drawing the line to keep it horizontal
- Look at the "Info" tab to measure the number of pixels
- Note: If image is zoomed the calibration remains accurate. However if image is zoomed before the bar is draw the zoomed factor must be factored into the um per pixel determination. Of course cropping has no effect on the number of um/pixel.
|
|
|
Copyright 2001-2015 Dr. M. Chua, School of Medicine, University of North Carolina, Chapel Hill, NC 27599 |
| Go Back | Booking Resources |
Questions/comments/problems: Michael Chua |
|
|
Last Updated: 2014-07-24 |